Sunday, August 30, 2009

Color Transformation


Our painting project is finally finished! It makes such a shocking difference in the room! I can't believe how dark it was with the red.

I will say that going from the dark red to white was a pretty intensive project. We had to use Kills as a primer to cover it. Then we did a coat of each color. When we took the tape off, we learned that the Kills was pulling off at the edges with the tape. What a pain! We had to do about 4 hours worth of touch up painting. But, I can honestly say that the paint job is the best one that my husband and I have ever done.

If you wondered if my husband is happy with the new room -- yep. He is. He can't believe the change and how much brighter it is in there. We spend a large portion of the day in there since my computer office is also my dining room. I love being in there and I really enjoy how classy it looks. I can't wait to pull together the wall decor and really make it shine!

We are victims!

We have been plagued by blight this year. First, we lost the zucchini plant. Then the cucumbers. Now, the tomatoes are starting to succumb. It's so sad! We're going to have to ride it out and see what happens, because once your garden is infected, it's almost impossible to stop.

We've been loosing leaves from the tomato plants for a while, but were uneducated as to how brutal this was going to be. Today, this is how we found several of the tomatoes:
For those of you on the East Coast, you may or not be familiar with blight. It arrived in the area about 10-15 years ago, and has been destroying crops ever since. It is a fungus that develops well in wet, moist conditions. It survives in temperatures up to 95 degrees in the day and as low as 65 degrees in the night -- a perfect New England summer. This is the same disease that destroyed potatoes and caused the great Irish potato famine that resulted in the Irish immigration to America in the 1840s to 1850s. There are no real remedies for blight once it has arrived. Currently, there are no plants that are resistant to the fungus.

Learn more about blight here.
We picked about 8 pounds of tomatoes today, bringing our grand total to 37 pounds. Not bad considering the blight plague. We're hoping to get more, but it's going to be an effort to beat the blight now. I'm afraid it's going to take over.
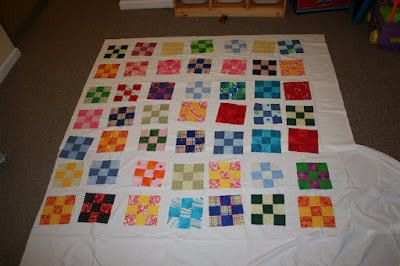
All in all, our garden has not yet provided enough produce to have paid for it's construction. It cost about $350 to put together, plant and fill with the proper soil. We've probably saved about $150 in produce expenses. Over time, it will pay for itself I guess, but so far we're in the red. Hopefully next year won't be so moist.

Wednesday, August 19, 2009

Painting Day 1.5


I know it's almost impossible to see the differences in paint color here. And, I had to take the pictures out of focus because the camera couldn't find something to focus on. But, you get the general idea of where we plan to go.
Right now I think we're going to go with 'Hanoki' as the color. Check back. It seems to be changing by the hour.

Painting Day One

Here's what it looks like after one coat of primer. I think we'll do the color next -- that is if we ca decide on which one.

Temporary Hiatus


I've had to put a hold on sewing this week. I've forced my family into accepting a re-model of our dining room. I'm the only one that's really excited about it. My husband is a very reluctant participant. He has really enjoyed the red and isn't sure he wants it to go away. I have to give him credit though -- he's doing the work right along with me and not complaining one bit.
This red is where we started. I can't wait to see where we end up!

Fantastic Voyage Step #7

If you've been following along for the Fantastic Voyage quilt, we've reached step #7 -- putting the top together. I love this step! It always makes me feel like the time and creative energy was worth all the effort.
The trick to getting your top together correctly for this pattern is alternating the orientation for every block. The outside strips should be at 90 degrees from each other. It's easiest to look at the picture and figure it out. Promise!
I liked sewing two blocks together and then two additional blocks and so on. Then it's easy to iron them and stack them and then proceed to sew two to two. The four to four.
The final strips will each have 8 blocks. You should have eight strips of eight blocks each. By the time the entire quilt is assembled, it will be 8 blocks x 8 blocks.
That all came out a bit confusing sounding, but it should be pretty easy to interpret I hope.

All Right Garden!!!


It seems like we have really turned a corner in the garden. I've been able to get about 8 pounds worth of tomatoes over a 48 hour time period this week. I attribute it to three things:
  • Time
  • Not watering -- thanks Wendy!
  • Heat - finally we have had a few sunny, hot days in a row

I did a lot of research on how to turn your green tomatoes into red ones. One of the basic tips was to only water every 2-3 days. I've been watering every single day. I didn't know they only needed water every 2-3 days, even in the heat of summer. So, I stopped watering this week. I haven't given them any water since Saturday, and we seem to be doing much better now. I'll probably throw on a little water today, but not too much.

If you're struggling like I am -- I live in fear of all those 200 tomatoes dying in the soon-to-come frost, there are additional ways to turn your tomatoes if that frost is headed your way. I've gathered a few from the Internet here. Now, I haven't tried these yet myself, but if we get closer to the first frost and I still have bunches on the vine, you can bet I'll start trying different things to save them!

  • The ol' brown paper bag trick -- apparently this works on tomatoes as well as peaches
  • Place them a box, in the dark, with an apple. The apple apparently provides the necessary chemicals in the air to turn them red. Who knew?
  • Pick them and just let them sit on your counter out of direct sunlight until turning red.

Monday, August 17, 2009

Canned Salsa


Last August I canned salsa and have thoroughly enjoyed the fresh taste of summer all year long. I had really hoped to take peppers and tomatoes from our garden to make more this summer. So far, I'm really out of luck! We've only had enough tomatoes for one meal about every other day. UGH! We're just finishing off the final two jars from last year.
But, for those of you that have an abundance of produce and are looking for a good canned salsa recipe, I highly recommend this one! It's got a fresh taste, a little bit of vinegar bite and the yummy background flavor of cilantro.
You do need to cook it until the water disappears -- it will be runny if you don't cook it until it's at 1/2 the original volume. Warning -- it goes fast! We eat several cups worth each time we have nachos.
Canning Salsa

3 qt. tomatoes, peeled and coarsely chopped
1 qt. onions, coarsely chopped
1 c. green peppers, coarsely chopped
4-6 jalapeno peppers, seeded and finely chopped
4-6 cloves garlic
1-2 tsp. salt
1/2 bunch of cilantro
1/2 c. sugar
3/4 c. 5% apple cider vinegar

Cook down to 1/2 volume. Put into sterilized jars; seal and water bath 20 minutes for pints or pressure at 5 pounds for 5 minutes.

Summer Quilt-a-long progress

This quilt has been such a challenge for me! I'm finally making real progress. I tried laying out all my squares on white fabric just to see what it would look like. I'm starting to like it, but it's so different from my usual attempts it's a mental struggle to work on it. I've been distracted with a million projects, but I'm promising to finish this one by the end of September. Pinky promise!

Tuesday, August 11, 2009

Toy Management

I love our basement! When were looking for a home, a usable basement was a must have! We've put the TV and all the kids toys down there. It makes the rest of the house much easier to keep clean.

Until two weeks ago, the toys were all over the place. I've been dreaming of these toy organizers from IKEA for years. This summer, the dream became reality. YEAH!!!! I love them! The kids are actually playing with the toys and then they clean them up every night before going to bed. It's amazing! My 20-month-old will clean up his own toys and knows that the bin needs to be put away before the job is finished. I'm in Mommy Heaven!
I've been thinking about how I could make the bins even cuter than they are, and here's what I've done -- I designed labels for each of them. There's both pictures and words so that kids of varying ages will know what's available and how to clean it up when they're finished using something.


I have a few bins left to finish, but I've run out of steam for a bit. I'll come back to it in a couple of weeks and finish the rest.

To the Food Growers of America

To the Food Growers of America,

Thank you! Thank you for every ounce of effort you put into feeding my family. Thank you for choosing to support your families in a profession that is getting less and less respect. Thank you for working long hours in the hot sun to bring healthy fruit and vegetables to my table.

Until this year, I did not appreciate your valiant efforts. Now I understand how hard you must be working. I understand the acres of plants you must nurture to have enough crop to make money. I understand the sadness when a plant in your care dies. I now understand the amount of education and experience you must possess to produce enough crops to feed your family.

I thank you. For my garden has not produced enough to sustain us. We have enjoyed its fruits and hope to learn and grow to make it more productive over the years. You, dear farmers, have offered up your wonderful product when ours has failed to meet the demand. Thank you, thank you, thank you!

For those who may doubt the sincerity of my thanks, I offer you the evidence of my gratitude. After 4 months of service, our garden has produced these wonderful vegetables:

I'm grateful for what we have been able to grow, and I hope we continue to see more. But I am also very thankful for the farmers that will take up the challenge and produce the food I cannot seem to grow. Thank you!

Yahoo!!!

This morning, I was missing my beloved EQ5 as I worked on my new computer. For my birthday this past year, I saved all my pennies and bought this great new laptop which I love, love, love! But, it is Vista, and I didn't think that EQ5 would work on Vista.

I tried it out and sure enough it works!
I've spent the morning playing with my long lost software friend. I've been dreaming up ways to use my wonderful Snippets fabric from Moda. It's a take on this quilt -- just a grown-up size using turnovers instead of a charm packet.
I'm off to sew!

Monday, August 10, 2009

Fantastic Voyage Step #6

I love getting to the part where it all starts to come together!

In this step, you're going to add the 1.5 x 8.5 inch strips to the side of each block. Use two strips of the same color for the frame on each block. It helps to give the quilt a small bit of consistency and definition.

Take your block as it is, then add one strip to the left, and one to the right. I did not use chain sewing on this step -- I wanted to make sure I was duplicating the correct color.

As always, iron each block. I have to lay mine out on the floor as I iron so that I can see the effect of the quilt as it starts to emerge. LOVE IT! This part always makes me feel warm and fuzzy!

Fantastic Voyage Step #5


You are going to sew two of your small blocks together in opposite directions. If you look at the picture above, you can see that the large pieces to the side end up on opposite ends from one another. This is what helps to give it such a scrappy look.

For this step, again you need to make sure that all the blocks look the same when you finish sewing them. The easiest way to do this is to set them into a stack, all facing the same way. When you pick up two to sew together, turn one so that it is in the opposite direction and then sew. Again, I used chain sewing to make this go really fast. After sewing the two halves together, iron and lightly starch them. It will make every step after a bit easier.

You should end up with 64 blocks -- our final number!

This step took about an hour.

Thursday, August 6, 2009

Fantastic Voyage Step #4

Step #4 -- It's starting to come together! Stack your mini-blocks all together. Turn the stack so that you have it with piece C on the bottom. Place another piece C (2.5 X 4.5) next to the piece you have already sewn. It should look like the block in the picture above. Sew with right sides together. Duplicate for all 128 blocks.

Iron and open.

I'm realizing that I may not have enough pictures for visualization. If someone actually reading this would like more detailed pictures, let me know.

Fantastic Voyage Step #3


Step #3 is also fairly easy. There's only one trick -- sew everything on the same side. Lay out your pieces from step #2. Next to them, place your stack of Piece C fabric. You're going to sew Piece C to the long side of your two pieces with the right sides together. It will make three parallel seams.

If you don't sew all the pieces on the same side, the next step in the quilt will not work properly. So use caution!

Iron open and starch. When finished, you should have 128 building blocks for your quilt that have three strips of fabric in each.

Wednesday, August 5, 2009

Fantastic Voyage Step #2

Step #2 is easy and fun. All you do is take two Piece A strips -- these are 1.5 x 4.5. Sew them together down the long side. I used the chain piecing method(where you don't cut the thread between each set of strips. That way it only took me about one hour to finish this step.
When you are finished, iron and starch as desired. I like stacking in groups of 10 so that I can be sure all 128 building blocks are there.

Fried Green Tomatoes

Yep. My southern-belle of a grandma is rolling in her grave. Her Yankee grand-daughter just grew a tomato in Connecticut and then made fried green tomatoes with that same tomato and loved it.

I don't know what that traditional southern way of making fried green tomatoes is supposed to be, so I just made up my own way.

This poor little tomato had fallen off the tomato plant. He seemed in perfectly fine shape to me, so I thought I'd fry him up for dinner. Here's what I did:
Fried Green Tomatoes
Batter:
1/2 cup all-purpose flour
1 teaspoon Lawry's seasoning salt
2 tablespoons grated Parmesan cheese
1 egg, beaten
Slice the tomatoes fairly thin, about 1/8-1/4 inch thick. I liked the thinner ones the best -- they had a good crunch to them.
Dredge in beaten egg.
Dredge in flour.
Gently place into VERY hot oil -- if it isn't hot, the tomato will get all oily and soggy instead of crispy.
Fry for about 2 minutes on each side. Try not to jostle or flip the tomatoes too roughly or the tasty batter will fall off.
Place on a paper towel to drain.
Serve with dipping sauce. I used Alabama BBQ sauce, but it would taste great with Ranch too.

Fantastic Voyage Step #1

The first step in making this quilt is to cut all the little pieces. If you cut them all in the beginning, the quilt is a speedy assembly.
You can start with 12 half-yard pieces of coordinating fabric. Or, you can use two honey-buns and one jelly-roll (the pre-cut Moda fabrics). Either way, you're going to be cutting them into these same little pieces.
First, iron and starch all fabrics for a smooth start to cutting.
Then, prepare the following pieces:
Piece A --
  • 1.5 inches wide by 4.5 inches long
  • you will need 256 of these pieces
  • Pre-cut fabrics -- cut seven Piece A sized strips from each of the 40 fabrics included
  • Half-yard method -- cut three strips that are 1.5 inches wide from each of the twelve fabrics. Then cut those at 4.5 inch intervals. You will need eight Piece A to be cut from each 1.5 inch strip

Piece B --

  • 1.5 inches wide by 8.5 inches long
  • You will need 128 of these pieces
  • Pre-cut fabrics -- cut four Piece B sized strips from the second package of honey bun fabrics, making sure to use each of the fabrics included
  • Half-yard method -- cut two 1.5 inch wide strips from each fabric. Select two fabrics and cut an additional 1.5 inch strip from each. Then cut all of the 1.5 inch strips into pieces that are 8.5 inch long strips. You should get five Piece B's from each 1.5 inch strip
Piece C --
  • 2.5 inches wide by 4.5 inches long
  • You will need 256 of these pieces
  • Pre-cut fabrics -- cut seven Piece C sized strips from each of the 40 fabrics included in the Jelly Roll package
  • Half-yard method -- cut three strips that are 2.5 inches wide from each of the twelve fabrics. Then cut those at 4.5 inch intervals. You will need eight Piece C to be cut from each 2.5 inch strip

Phew! That's quite a bit of cutting. I believe the cutting took me about 2.5 hours to finish.

Molten Chocolate Lava Cake

While our friends were in town, we had planned on having molten chocolate cake which I posted last week.

As is always the case, I found a better recipe just before making it and decided to try it instead. Thanks to the Pioneer Woman, it was a huge success. We loved it so much we made it again later in the week. I've tripled the Pioneer Woman's recipe. We baked it in a 9 x 13 pan and just scooped it out and served it with ice cream.

It probably would have been cooler in individual cups, but I don't have twelve of them.

Molten Chocolate Cake -- Pioneer Woman
12 oz Semi-sweet chocolate chips
1 1/2 cup butter
3 cups Powdered Sugar
6 whole Eggs
6 whole Egg Yolks
1 cup, 1 ounce Flour

1. Preheat oven to 425 degrees.
2. Spray 12custard cups (or a 9 x 13) with Pam and place on cookie sheet.
3. Microwave chocolate and butter in large bowl on high for about 1 minute, until butter is melted. whisk until chocolate is also melted.
4. Stir in sugar until well blended. Whisk in eggs and egg yolks. Stir in flour.
5. Divide between cups.
6. Bake 13-14 minutes until sides are firm and center is soft. Let stand 1 minute.

If using a 9 x 13, bake about 2 minutes longer -- 16 minutes should do it.